制作带有气象站的小台钟

在这个项目中,我将向您展示如何制作带有气象站的小台钟
这是一篇分步文章,我将指导您完成使用 Mini LCD 显示屏、Wemos D1 Mini 微控制器、锂离子电池以及显示实时天气和时间的功能来创建您自己的桌面时钟的过程。温度数据。
该项目结合了电子、编程和创造力,打造了一款独特且实用的办公桌配件
通过建设这个项目,您能期待什么?
有很多东西,但最重要的是,您将拥有一个台钟,可以显示实时温度、日期、日期和时间。
除此之外,您还将学到很多东西,例如如何建立连接以及电子和编程的基础知识。


以下是制作这款台钟所需的组件
esp8266
液晶显示模块
面包板
充电模块(C型)
电池
面包板
烙铁和铅
Arduino IDE 和编程电缆
可选 - 3D 打印机、定制 PCB

这个项目的电路非常简单
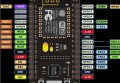
因此,我们首先将 1.54 英寸 LCD 模块连接到 wemos d1 Mini。
wemos d1 Mini 的 5 伏将连接 LCD 模块的 vcc,g 连接 LCD 模块的 gnd,d4 连接 RST,D2 连接 DC,D8 连接 CS,D7 连接 Din,clk 连接 D5


我将使用面包板和跳线来制作原型电路。
首先将 esp8266 模块连接到面包板,然后使用跳线连接显示模块。
为了为这个项目供电,我将使用可充电锂离子电池。
电路完成后,我们可以开始上传该时钟的代码。


设置 Arduino IDE
如果你没有IDE。从 Arduino 官方网站 ( https://www.arduino.cc/en/software)下载并安装 Arduino IDE 。
使用 USB 电缆将 Wemos D1 Mini 微控制器连接到您的计算机。
打开 Arduino 草图
打开 Arduino IDE。您可以在这里获取该项目的 Arduino 代码https://bit.ly/3qe1FI5
在 IDE 中,转到文件 -> 打开并找到桌面时钟项目的 Arduino 草图(代码)文件。在 IDE 中打开该文件。
从“工具”菜单中,选择“主板”,然后选择“Wemos D1 R1”或“Wemos D1 R2 & mini”作为主板。
接下来,转到“工具”->“端口”并选择与您的 Wemos D1 Mini 相对应的 COM 端口。
更改 Wi-Fi 凭据
单击“验证”按钮(复选标记图标)编译代码。确保控制台中没有显示错误或警告。
代码编译成功后,单击“上传”按钮(箭头图标)将代码上传到 Wemos D1 Mini 微控制器。
IDE 将显示上传进度,完成后,您应该在控制台中看到“完成上传”。
现在您可以看到显示屏打开并直接连接到您的 WiFi,几秒钟后您的时钟将显示数据


正如你所看到的,因为我使用面包板来构建电路,所以项目很大,如果你不想在零 PCB 或面包板上组装电路,并且你想要用于该项目的 PCB,那么这里是 PCB你。我先用EasyEDA画了原理图。
我想把这个项目缩小到一个小尺寸,所以我为此制作了一个PCB。
您可以直接使用我的 Gerber 文件,也可以创建您自己的。
Gerber 文件,代码: https: //bit.ly/3qe1FI5
您可以使用此 Gerber 文件为本项目订购高质量 PCB。为此
为什么选择PCBway
最高效、经济、创新的 PCB 解决方案
更高品质
更低的花费
更快的交货


我得到了定制的 PCB,它们的质量非常高。
现在电路变得非常非常小。
您所需要的只是将组件焊接到 PCB 上。
我先焊接了电池充电模块,然后焊接了Wemos板
我们先将 LCD 封装在 3D 打印的盒子中,然后再安装 LCD。


幸运的是,所有部件都非常适合我的 3D 打印外壳。
首先将液晶显示板添加到盒子上,我使用了小块双面胶带,在上面放置了电池,后来我将开关焊接到盒子的底部。
电池直接焊接到 PCB 上。
现在您可以合并外壳并与螺钉连接,请注意,我不完全知道螺钉的尺寸,但您可以使用任何微小的短螺钉。


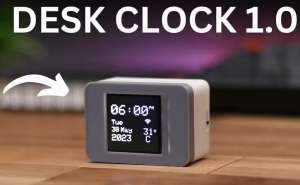
最终完成后,您所需要做的就是按下开关。
LCD就会显示连接符号
连接后您可以直接看到时钟。
您可以查看日期、时间和天气统计数据。
您可以将这个小时钟放在您最喜欢的地方!
原理图

code:
#include <ESP8266HTTPClient.h>#include <ESP8266WiFi.h>#include <WiFiClient.h>#include <Adafruit_GFX.h>#include <Adafruit_ST7789.h>#include <SPI.h>#include <ArduinoJson.h>#include <NTPClient.h>#include <WiFiUdp.h>#include "bitmaps.h" //ESP82266 Board Manager - https://arduino.esp8266.com/stable/package_esp8266com_index.json// WIFI INFORMATION#define WIFI_SSID "YOUR WIFI SSIDE"#define WIFI_PASSWORD "YOUR WIFI PASSWORD"#define JSON_MEMORY_BUFFER 1024*2// DISPLAY PINS#define TFT_CS 15#define TFT_DC 4#define TFT_RST 2 #define TFT_BL 5// You can get API KEY and HOST KEY from RapidAPI, Search weatherapi.com and subscribe.const char* API_KEY = "YOUR API KEY";const char* API_HOST = "YOUR HOST KEY";// Display and WiFiUdp Adafruit_ST7789 tft = Adafruit_ST7789(TFT_CS, TFT_DC, TFT_RST);WiFiUDP ntpUDP;// NTP pool link:- // in.pool.ntp.org is for India// You can visit pool.ntp.org to find your serverNTPClient timeClient(ntpUDP, "in.pool.ntp.org"); // Latitude and Longitude of you location. float lat = 28.63;float lon = 77.22; // API endpoint.String weather_url = "https://weatherapi-com.p.rapidapi.com/current.json?q=" + String(lat) + "%2C" + String(lon);// Global variablesString current_time;String hour;String minute;String alternative;String weekDay;String month;int day;int year;int temp;// Array for days and monthsString weekDays[7]={"Sun", "Mon", "Tue", "Wed", "Thu", "Fri", "Sat"};String months[12]={"Jan", "Feb", "Mar", "Apr", "May", "Jun", "Jul", "Aug", "Sep", "Oct", "Nov", "Dec"};// For delay in fetching weather data.unsigned long lastTime = 0;unsigned long fetch_delay = 5000;void setup(void){  // Initialization  Serial.begin(9600);   tft.init(240, 240);  WiFi.begin(WIFI_SSID, WIFI_PASSWORD);  timeClient.begin();  // Set this to you timezone in seconds i.e 5:30 = 19800 seconds;  timeClient.setTimeOffset(19800);  // Set display rotation  tft.setRotation(3);  // Clear display  tft.fillScreen(0);  // Set text color  tft.setTextColor(ST77XX_CYAN);  // Set font size  tft.setTextSize(2);  String loading = ".";  // While connecting to wifi   while(WiFi.status() != WL_CONNECTED){      tft.setCursor(40, 90);    tft.println("Connecting to ");    tft.setCursor(40, 125);    tft.print(WIFI_SSID);    tft.println(loading);    loading += ".";    delay(500);  }  // Clear display  tft.fillScreen(0);  // Show connected  tft.setCursor(60, 110);  tft.println("Connected!");  delay(3000);  // Clear display and fetch tempurature  tft.fillRect(60, 110, 130, 50, ST77XX_BLACK);  fetchTemp();}void loop(){  // Update time.  timeClient.update();  // Fetching weather after delay  if((millis() - lastTime) > fetch_delay){    currentTime();    fetchTemp();    lastTime = millis();  }  // Displaying items.  display();}void display(){  // default font size = 6x8px  int font_w = 6;  int font_h = 8;  // UI size  int time_size = 6;  int alt_size = 2;  int day_size = 3;  // Display WxH  int display_w = 240;  int display_h = 240;  // Distance between items  int padding = 8;  tft.setTextSize(time_size); // ie. 6x8 * 5 = 30x40  tft.setTextColor(ST77XX_WHITE, ST77XX_BLACK);  // X and Y of time on screen  int time_x = (display_w/2) - ((font_w*time_size)*5)/2 - (font_w * alt_size);  int time_y = 40;  tft.setCursor(time_x, time_y);  tft.println(current_time);  tft.setTextSize(alt_size);  tft.setCursor((time_x + (font_w*time_size)*5), time_y);  tft.println(alternative);  tft.drawBitmap((time_x + (font_w*time_size)*4 + 14), (time_y + (font_h*time_size) + padding), wifi, 31, 24, ST77XX_WHITE);  tft.setTextSize(day_size);  tft.setCursor(20, time_y+(font_h*time_size) + padding + 10);  tft.println(weekDay);  tft.setCursor(20, time_y+(font_h*time_size) + (font_h*day_size) + padding * 2 + 10);  tft.println(day);  tft.setCursor(20 + (font_w * day_size)*2 + padding, time_y+(font_h*time_size) + (font_h*day_size) + padding * 2 + 10);  tft.println(month);  tft.setTextSize(4);  tft.setCursor(20,  time_y+(font_h*time_size) + (font_h*day_size) * 2 + padding * 3 + 10);  tft.println(year);  int temp_x = display_w - (font_w * 4)*2 - padding - (font_w * alt_size);  tft.setCursor(temp_x,  time_y+(font_h*time_size) + (font_h*day_size) + padding * 2 + 10);  tft.println(temp);  tft.setTextSize(alt_size);  tft.setCursor(temp_x +(font_w * 4) *2 , time_y+(font_h*time_size) + (font_h*day_size) + padding * 2 + 10);  tft.println("o");  tft.setTextSize(4);  tft.setCursor(temp_x + 10 ,time_y+(font_h*time_size) + (font_h*day_size) * 2 + padding * 3 + 10);  tft.println("C");}// Formatting and setting timevoid currentTime(){  hour = String(timeClient.getHours());  minute = String(timeClient.getMinutes());  weekDay = weekDays[timeClient.getDay()];  time_t epochTime = timeClient.getEpochTime();  struct tm *ptm = gmtime ((time_t *)&epochTime);  day = ptm->tm_mday;  int current_month = ptm->tm_mon+1;  month = months[current_month-1];  year = ptm->tm_year+1900;  if(hour.toInt() >= 12){    alternative = "PM";  }else{    alternative = "AM";  }  if(hour.toInt() > 12){    hour = map(hour.toInt(), 13, 24, 1, 12);  }  if(hour.toInt() < 10){    hour = "0" + hour;  }  if(minute.toInt() < 10){    minute = "0" + minute;  }  current_time = String(hour) + ":" + minute;}// Getting tempurature from API using Https requestvoid fetchTemp(){  WiFiClientSecure client;  HTTPClient https;  client.setInsecure();  https.useHTTP10(true);  if(https.begin(client, weather_url.c_str())){    https.addHeader("x-rapidapi-key", API_KEY);    https.addHeader("x-rapidapi-host", API_HOST);    int httpCode = https.GET();    if(httpCode > 0){      if(httpCode == 200){        DynamicJsonDocument doc(JSON_MEMORY_BUFFER);        DeserializationError error = deserializeJson(doc, https.getStream());        Serial.print(https.getStream());        if(error){          Serial.println("deserialization error");          Serial.println(error.f_str());          temp = -1;        }else{          temp = doc["current"]["temp_c"].as<int>();        }      }    }  }  https.end();}
Credits
bitmaps.h
const uint8_t wifi[] PROGMEM ={0x00, 0x00, 0x00, 0x00, 0x00, 0x07, 0xc0, 0x00, 0x00, 0xff, 0xfe, 0x00, 0x03, 0xff, 0xff, 0x80, 0x0f, 0xf0, 0x0f, 0xe0, 0x1f, 0x00, 0x01, 0xf0, 0x3c, 0x3f, 0xf0, 0x78, 0x78, 0xff, 0xfe, 0x3c, 0x23, 0xff, 0xff, 0x88, 0x07, 0xc0, 0x0f, 0xc0, 0x0f, 0x07, 0xc1, 0xe0, 0x06, 0x3f, 0xf8, 0xc0, 0x00, 0xff, 0xfe, 0x00, 0x00, 0xf8, 0x3e, 0x00, 0x00, 0xe0, 0x0e, 0x00, 0x00, 0x0f, 0xe0, 0x00, 0x00, 0x1f, 0xf0, 0x00, 0x00, 0x1f, 0xf0, 0x00, 0x00, 0x00, 0x00, 0x00, 0x00, 0x01, 0x00, 0x00, 0x00, 0x03, 0x80, 0x00, 0x00, 0x03, 0x80, 0x00, 0x00, 0x01, 0x00, 0x00, 0x00, 0x00, 0x00, 0x00};扫描二维码推送至手机访问。
本サイト上に掲載の文章、画像、写真などを無断で複製することは法律で禁じられています。全ての著作権はGAMESHに帰属します。


